Battery switch on travel trailer function is crucial for managing your RV’s power. Understanding how this simple yet vital component works is key to enjoying trouble-free camping. This guide will walk you through everything from its basic operation to troubleshooting common issues and essential maintenance.
We’ll cover the different types of battery switches (single-pole, double-pole, etc.), how to wire them correctly, and what to do if your switch malfunctions. Safety is paramount, so we’ll also delve into essential safety precautions and equipment to use when working with your RV’s electrical system. Finally, we’ll explore how the battery switch interacts with other systems in your travel trailer, like solar panels and converters.
Understanding Battery Switch Functionality in Travel Trailers
A battery switch is a crucial component in a travel trailer’s electrical system, acting as a central control point for your house batteries. It allows you to disconnect your batteries completely for safety and to prevent parasitic drain, or to select which battery bank (or combination) powers your trailer’s systems. Understanding how it works is essential for maintaining your RV and preventing costly issues.Battery Switch Types and Wiring ConfigurationsDifferent types of battery switches offer varying levels of control over your trailer’s battery banks.
The choice depends on your setup’s complexity and power needs.
Single-Pole Battery Switches
These switches are the simplest type, typically used with a single battery. They offer an on/off function, effectively connecting or disconnecting the battery from the trailer’s electrical system. A single-pole switch is suitable for trailers with only one house battery and basic electrical needs. The wiring is straightforward: the battery’s positive (+) cable connects to the switch’s input, and the switch’s output connects to the positive (+) bus bar or distribution panel that feeds the trailer’s 12V systems.
The negative (-) cable connects directly to the chassis or a common ground point.
Double-Pole Battery Switches
These switches control both the positive (+) and negative (-) sides of a single battery. This provides a more complete disconnection, minimizing the risk of accidental shorts or current flow. While offering improved safety compared to single-pole switches, they still only manage one battery bank. The wiring mirrors the single-pole setup, but with separate connections for both positive and negative terminals to the switch.
Double-Pole Double-Throw (DPDT) Battery Switches
These are the most versatile type, typically used in trailers with two battery banks (e.g., one for house systems and another for starting the tow vehicle). A DPDT switch allows you to select between: (1) Battery 1 only, (2) Battery 2 only, (3) Both batteries combined (parallel), or (4) Both batteries disconnected. This offers the greatest flexibility and control over power distribution.
The wiring is more complex, involving connections to both battery banks and a system for combining them in parallel when needed. This often requires a more robust bus bar or distribution panel.
Operating a Battery Switch: A Step-by-Step Guide
Before operating your battery switch, consult your trailer’s owner’s manual for specific instructions. Improper operation could damage your electrical system or create safety hazards.
- Identify the switch positions: Clearly understand the different positions of your switch (e.g., “Off,” “Battery 1,” “Battery 2,” “Both”).
- Turn off all 12V appliances: Ensure that all lights, appliances, and other 12V devices are turned off before switching batteries.
- Select the desired position: Carefully move the switch to the position that corresponds to your needs. For example, if you are storing your trailer, move it to the “Off” position to completely disconnect the batteries.
- Verify the connection: After switching, briefly check if the selected battery or batteries are supplying power to the trailer’s 12V systems. Use a multimeter to check voltage if necessary.
Always remember to turn the battery switch to the “Off” position when the trailer is not in use to prevent battery drain.
Troubleshooting Common Battery Switch Issues: Battery Switch On Travel Trailer Function
Your travel trailer’s battery switch is a crucial component, connecting your house batteries to shore power or your tow vehicle. Problems with this switch can leave you without power, making troubleshooting essential for a smooth camping experience. Let’s explore some common issues and how to fix them.
Common Battery Switch Problems, Battery switch on travel trailer function
Several issues can plague your battery switch. These range from simple fixes like corroded connections to more serious problems needing professional attention. Understanding these problems helps you diagnose and resolve them effectively. The most common problems include no power to the trailer, blown fuses, and corroded connections on the switch itself or the wiring leading to it.
Sometimes, the switch itself may be faulty and require replacement.
Troubleshooting Steps for a Malfunctioning Battery Switch
Before diving into complex repairs, systematically check the obvious. First, verify your batteries are charged. A simple voltage check with a multimeter is crucial. Next, inspect all fuses related to the battery system. Replace any blown fuses and investigate why they blew; this could indicate a larger electrical problem.
Thoroughly examine all connections for corrosion; clean them with a wire brush and apply dielectric grease to prevent future corrosion. If the problem persists after these checks, it’s time to test the switch itself.
Testing the Battery Switch with a Multimeter
A multimeter is your best friend for diagnosing electrical problems. To test your battery switch, you’ll need a multimeter set to measure DC voltage. First, ensure the switch is in the “off” position. Then, place the multimeter probes on the input terminals of the switch (where the power comes in). You should read near zero volts.
Next, switch the battery switch to the “on” position and measure the voltage again. You should now read a voltage close to the voltage of your battery (typically around 12V for a 12V system). If you don’t see a significant voltage change, the switch may be faulty. Remember to always disconnect the negative terminal of your battery before testing to prevent accidental shorts.
Troubleshooting Flowchart
Imagine a flowchart. It would start with a “No Power” box. From there, an arrow points to “Check Batteries (Voltage)”. If the batteries are low, the problem is solved by charging them. If not, another arrow leads to “Check Fuses”.
If a fuse is blown, it branches to “Replace Fuse & Investigate Cause”. If fuses are okay, an arrow directs to “Inspect Connections for Corrosion”. Cleaning corroded connections solves the issue. If the connections are clean, another arrow goes to “Test Battery Switch with Multimeter”. A faulty switch leads to “Replace Battery Switch”.
If the switch tests okay, the flowchart ends with “Investigate Further Electrical Issues”, suggesting a more complex problem requiring professional assistance.
Safety Precautions When Working with Battery Switches
Working with your travel trailer’s battery system requires careful attention to safety. Improper handling can lead to serious injury from electric shock, burns, or explosions from escaping battery gases. Understanding and following these precautions is crucial for protecting yourself and your equipment.
Incorrect operation of the battery switch, such as accidentally connecting the batteries in reverse polarity, can damage your trailer’s electrical system, potentially leading to fires or rendering appliances unusable. Neglecting regular maintenance, including cleaning battery terminals and checking connections, can increase the risk of corrosion and electrical arcing, which are fire hazards. Ignoring safety precautions can lead to significant financial losses due to repairs and replacement of damaged components.
Essential Safety Equipment
Before beginning any work on your travel trailer’s electrical system, gather the necessary safety equipment. This will help minimize risks and ensure a safe working environment. The right tools and protective gear are indispensable for preventing accidents.
Having the correct equipment on hand before you start working is critical. Improper tools can increase the risk of injury and damage.
| Safety Measure | Explanation |
|---|---|
| Eye Protection | Wear safety glasses or goggles to protect your eyes from sparks, acid splashes, or flying debris. Acid from the battery can cause serious eye damage. |
| Gloves | Use insulated gloves rated for working with batteries to protect your hands from electric shock and chemical burns. Battery acid is corrosive. |
| Protective Clothing | Wear long sleeves and pants made of non-flammable material to protect your skin from sparks and acid. |
| Insulated Tools | Use insulated screwdrivers and wrenches to prevent electric shock. Never use metal tools near exposed battery terminals. |
| Ventilation | Work in a well-ventilated area. Battery gases are explosive and can cause respiratory problems. |
| Baking Soda | Keep a container of baking soda nearby to neutralize any spilled battery acid. Baking soda neutralizes the acid, minimizing damage. |
| Fire Extinguisher | Have a suitable fire extinguisher (Class B or ABC) readily available in case of a fire. Electrical fires can spread rapidly. |
Safety Procedures During Battery Switch Operation
Following a structured approach when working with your battery switch is paramount for ensuring your safety and preventing damage to your equipment. Each step plays a vital role in minimizing risks.
Always disconnect the negative (-) battery terminal first when working on the electrical system. This prevents accidental shorts and protects you from electric shock. Reconnect the positive (+) terminal last.
| Safety Measure | Explanation |
|---|---|
| Disconnect Negative Terminal First | Always disconnect the negative (-) terminal before working on any part of the electrical system. This minimizes the risk of accidental shorts and shocks. |
| Reconnect Positive Terminal Last | When reconnecting the battery, connect the positive (+) terminal last. This prevents accidental short circuits and ensures safe operation. |
| Inspect Connections | Before and after each use, visually inspect all battery terminals and connections for corrosion, looseness, or damage. Clean terminals as needed. |
| Avoid Sparks | Avoid creating sparks near the battery. Battery gases are flammable and can ignite. |
| Proper Grounding | Ensure that your trailer is properly grounded to prevent stray electrical currents. |
Battery Switch Maintenance and Replacement
Keeping your travel trailer’s battery switch in top condition is crucial for reliable power. Regular maintenance prevents costly repairs and ensures your batteries perform optimally, providing consistent power for your appliances and systems. Neglecting maintenance can lead to corrosion, poor connections, and ultimately, battery switch failure.Regular maintenance extends the lifespan of your battery switch and prevents unexpected power outages while you’re enjoying your travels.
A well-maintained switch also helps avoid potentially dangerous situations related to faulty wiring or corroded connections.
Battery Switch Maintenance Schedule
A proactive maintenance schedule helps prevent problems before they arise. This schedule provides a guideline; adjust it based on your usage and environmental conditions (e.g., higher humidity may require more frequent cleaning).
- Monthly Inspection: Visually inspect the switch and its connections for any signs of corrosion, loose wires, or damage. Tighten any loose connections.
- Semi-Annual Cleaning: Thoroughly clean the battery terminals and switch connections using a wire brush and baking soda solution. Apply a corrosion inhibitor to prevent future corrosion.
- Annual Thorough Check: Perform a comprehensive inspection, including checking for any signs of overheating, unusual noises, or reduced functionality. Consider professional inspection every 2-3 years.
Cleaning Corroded Terminals and Connections
Corrosion is a common problem, especially in humid environments. It restricts current flow and can lead to overheating and damage. Here’s how to safely clean corroded terminals:
1. Disconnect the batteries
Always disconnect the negative (-) terminal first to prevent accidental shorts.
2. Prepare cleaning solution
Mix baking soda and water to create a paste. Alternatively, you can use a commercial battery terminal cleaner.
3. Clean the terminals
Use a wire brush to scrub away corrosion from both the terminals and the switch connections. Apply the cleaning solution and scrub again.
4. Rinse and dry
Rinse the terminals and connections with clean water and allow them to dry completely.
5. Apply corrosion inhibitor
Apply a corrosion inhibitor to protect the cleaned surfaces from future corrosion.
6. Reconnect the batteries
Reconnect the positive (+) terminal first, followed by the negative (-) terminal.
Replacing a Faulty Battery Switch
If your battery switch is consistently malfunctioning despite cleaning and maintenance, replacement is necessary. This procedure should be done by someone comfortable working with electrical systems and batteries.
1. Disconnect the batteries
Always disconnect the negative (-) terminal first.
2. Remove the old switch
Unscrew the switch from its mounting location. Take note of the wiring configuration before disconnecting any wires.
3. Install the new switch
Mount the new switch in the same location as the old one.
4. Reconnect the wires
Connect the wires to the new switch, ensuring they are connected to the correct terminals. Refer to the wiring diagram if necessary. Use appropriately sized wire nuts or crimp connectors for secure connections.
5. Reconnect the batteries
Reconnect the positive (+) terminal first, followed by the negative (-) terminal.
6. Test the switch
Test the switch to ensure it functions correctly.
Connecting New Battery Cables to the Switch
When replacing cables or connecting new ones, ensure you use cables of the correct gauge (thickness) for the amperage of your battery system. Improperly sized cables can overheat and create fire hazards.
1. Strip the cable ends
So, you’re planning a trip? Awesome! Before you pack your bags, remember travel insurance is key. Check out Aon travel insurance for comprehensive coverage; they’ve got options for every adventure. And if you’re looking for a bit more detail on specific policies, you might want to explore Aon travel insurance – their website offers really clear explanations of their plans.
Getting insured is a smart move; it lets you relax and enjoy your trip knowing you’re protected.
Carefully strip the insulation from the ends of the new cables, exposing enough bare wire to connect securely to the switch terminals.
2. Connect to the switch
So, you’re planning a trip? Awesome! Before you jet off, remember travel insurance is key. Check out Aon travel insurance for comprehensive coverage; they’re known for their solid reputation. Then, for a second opinion, maybe compare it with the options from Aon travel insurance – sometimes different websites offer slightly varied plans. Getting the right insurance will give you peace of mind, letting you fully enjoy your adventure!
Connect the cables to the correct terminals on the switch. Ensure the connections are secure and there is no exposed wire.
3. Secure the connections
Use appropriate connectors (wire nuts, crimp connectors) to secure the connections and prevent them from loosening.
4. Insulate exposed wires
Ensure all exposed wires are properly insulated to prevent shorts and maintain safety.
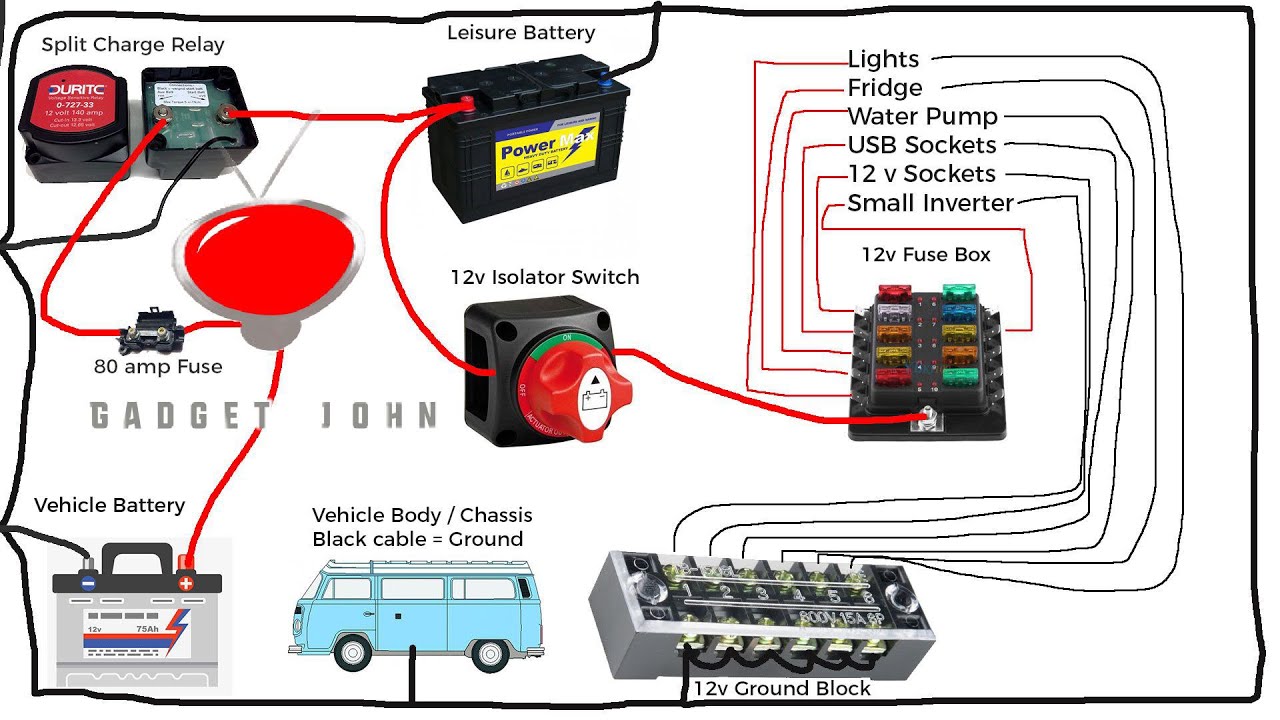
Battery Switch and its Integration with Other Systems
Your travel trailer’s battery switch is more than just an on/off switch; it’s a central component in managing the flow of power throughout your RV’s electrical system. Understanding how it interacts with other systems is crucial for efficient power management and preventing electrical problems. This section details the interplay between your battery switch and other key electrical components.The battery switch acts as a gatekeeper, controlling the power flow from your house batteries to various appliances and systems within your travel trailer.
Its interaction with other systems, such as solar panels, converters, and even your tow vehicle’s charging system, significantly impacts how efficiently your batteries are charged and discharged.
Interaction with Solar Panels and Converters
Solar panels generate DC power that needs to be regulated and stored. This is often done through a charge controller, which then feeds the power into your house batteries. The battery switch controls whether this solar-generated power is available to your house appliances or is isolated. Similarly, your converter transforms AC power from your shore power connection or generator into DC power to charge your house batteries.
The battery switch determines whether this charging current reaches the batteries. If the switch is off, neither solar nor converter charging will reach the house batteries, preventing overcharging or accidental discharge.
Different Battery Management Systems and Their Integration
Several battery management systems (BMS) exist, ranging from simple switches to sophisticated electronic systems. A basic battery switch simply connects or disconnects the batteries from the rest of the system. More advanced BMS may include features like automatic charging control, monitoring battery voltage and state of charge, and even preventing over-discharge or overcharging. These systems typically work in conjunction with the battery switch, using it as a primary control element.
For instance, a smart BMS might automatically engage the battery switch to connect the batteries to a charger when the voltage drops below a certain threshold, or disconnect them to prevent over-discharge.
Impact of the Battery Switch on the Charging Process
The battery switch directly impacts the charging process of your house batteries. When the switch is in the “off” position, the batteries are completely isolated from the rest of the electrical system, preventing both charging and discharging. This is important for long-term storage, preventing parasitic drain on the batteries. When the switch is “on,” power from the converter, solar panels, or your tow vehicle’s charging system can flow into the batteries, charging them.
Therefore, the switch acts as a master control for battery charging, ensuring the batteries are only charged when needed and are protected when not in use.
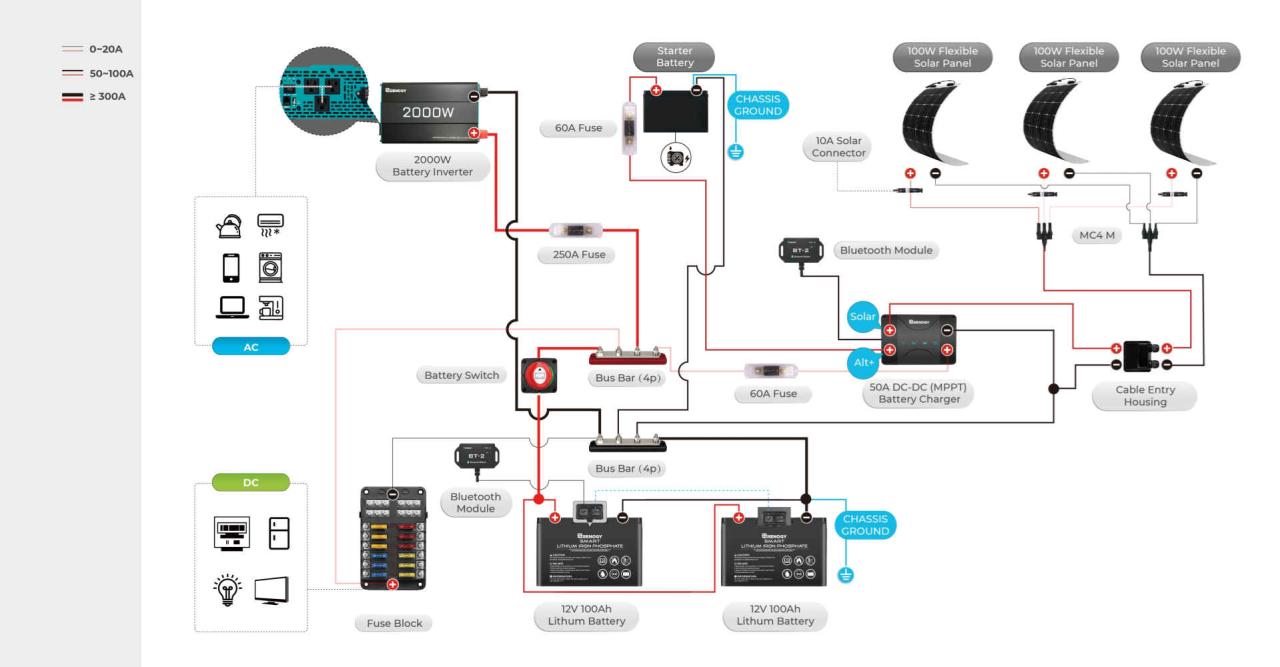
Diagram of Battery Switch and Other Electrical Components
Imagine a diagram showing a simplified RV electrical system. At the center is the battery switch, depicted as a three-position switch (Off, Battery, Both/Shore). Three lines extend from the switch. One line leads to a set of house batteries. Another line connects to a charge controller, which in turn connects to a solar panel array. A third line connects to a converter, which is further connected to an AC power source (shore power or generator). Arrows indicate the direction of power flow. The diagram clearly shows how the battery switch controls the flow of power from the solar panels and the converter to the house batteries, and ultimately to the various loads (lights, appliances, etc.) within the RV. Appliances are shown connected to the house batteries, with the power flow controlled by the battery switch. A legend explains each component.
Mastering your travel trailer’s battery switch empowers you to confidently manage your power and avoid frustrating breakdowns. By understanding its function, troubleshooting techniques, and safety procedures, you’ll ensure smooth and enjoyable adventures. Remember regular maintenance is key to extending the lifespan of your battery switch and preventing potential problems. So, get out there and enjoy the open road!
Commonly Asked Questions
What happens if I accidentally leave my battery switch in the “off” position?
You’ll lose power to all systems connected to your house battery. This means no lights, appliances, or anything drawing power from your house battery.
How often should I clean my battery terminals and switch connections?
At least once a year, or more frequently if you notice corrosion. Regular cleaning prevents poor connections and potential power issues.
Can I use a standard automotive battery switch in my travel trailer?
Not usually recommended. RV battery switches are often designed for higher amperage and may have additional features. Check your trailer’s specifications.
My battery switch is making clicking sounds. What could be wrong?
This often indicates a weak battery or a problem with the switch itself. Check your battery voltage and inspect the switch for damage. If unsure, consult a professional.
